Thursday 26 September 2013

Battle report Grey Knights vs Iyanden 1750 pts


Game background
A new player showed up at our local gaming club yesterday. He'd recently moved to the area, was looking for new stomping grounds and happy to play a game of 40k using his Grey Knights. We agreed on 1750 points.

I played the same wraith list as before, just sans Reavers.

Grey Knights
Scriptor, Mastery Level 3, Terminator Armour, Psi-sword (omniscience, guiding spirit, doom), Warlord
Xenos Inquisitor, Psi-sword, Servo-armour, Psi-gas-grenades, Beam-grenades, ML1 (omniscience)
9 Purificators, 4 Halberds, 2 Hammers, 2 Flamers, Knight of the Flame, Halberd
Vindicare-Assassin
10 Strikesquad, 7x Psi-swords, 2xPsi-Bolter, Justicar, Hammer, Rhino
Land Raider Redeemer, TL Assault Cannon, Psi-Ammo, Multimelter
Dreadnight, Sword, Flamer, Teleportmodule


Parameters
Mission 5: The Will of the Imperator. 2 objectives.
Deployment 2: Standard
Iyanden wins Initiative and keeps it.
Grey Knights force Nightfighting for round 1 via Warlord table.

Turn 1.1 Iyanden
Serpents advance 6" to 12".
Serpent evacuates the Assassin from the Ruins.
Two Serpents damage Rhino on the right.
Wraith knight attempts to damage the Dreadknight.


Turn 1.2 Grey Knights
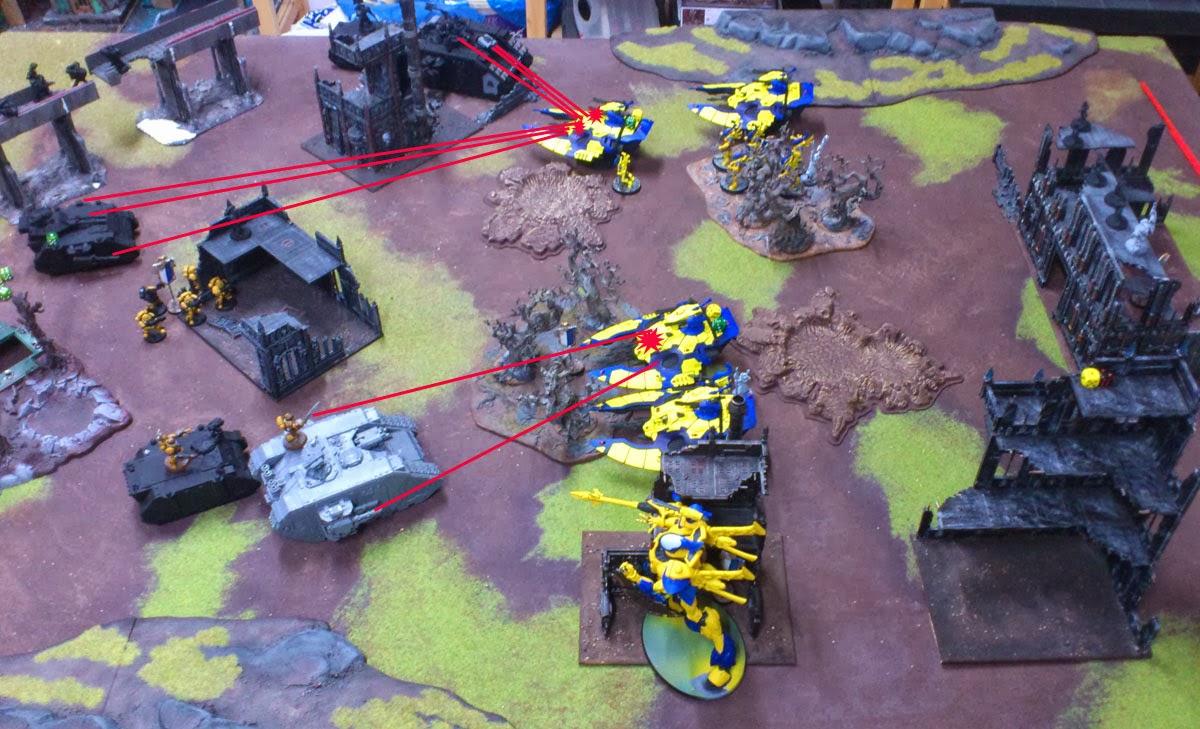
Land Raider advances and attacks the shield-less Serpent with Multi-Melter and Assault Cannon. Serpent makes the cover saves.
Grey Knights disembark from the Rhions. The squad on the left attack the previously hit serpent with Psi-bolters. Serpent makes the cover saves.
Dreadnight jumps 30" and hits the Wraithblades and the Wraithknight with his flamer. One Wraithblade falls.


Turn 2.1 Iyanden
Wraighguards disembark either before or just after the Serpents move.
Serpents glide into fire position on the disemparked Grey Knight squads and saturate the targets.
I had the glorious idea to go for the Dreadnight with my Wraithknight. I knew it would be a chancy thing, but didn't realize how long my odds really were. After shooting, impact and the Wraith's I5 attacks, the Dreadknight had one HP left and then promptly skewered the Wraithknight with his Psi-Sword. Oops! =]


Turn 2.2 Grey Knights
The Dreadknight his the same target with his flamer again, without losses this time.
The Land Raider advances 12"and then floors it in the shooting phase putting distance between itself and the Wraithguards 10 S10 AP2 shots.
Grey Knights on the left shoot at the Wraithguards with Warpscythes, but fail to inflict losses.
Grey Knights on the right advance towards the objective marker.


Turn 3.1 Iyanden
The Serpent between Wraithguards and Land Raider moves out of the way to the front left.
The other three Serpents take up firing positions. Two shoot at the Grey Knights on the left but fail to eliminate models. One chucks as many shots as possible at the Dreadknight hoping for a failed save for that last HP. This hope bears fruit and the Dreadknight falls.
The Spiritseer casts the Iyanden Primaris Power Voice of Twilight in the middle of the Wraithguard groups, succeds and grants all three units Battle-Trance. The two Wraithguard units on the right move through terrain and then run to get all models into the 12" range to the Land Raider. The Land raider is wrecked but does not explode. The Grey Knight are forced to hop out.
The Land Raider behind the Wraithguards pours fire into the disembarked Purificator unit, but this is stopped cold by the Omniscience of the Scriptor who makes all of his twin-linked 2+ saves.


Turn 3.2 Grey Knights
Purificator unit attacks both Wraithguard units. Using Grey Knight special gear the Toughness is dropped from 6 to 5 and instead of hitting on 4+, the Grey Knights auto-hit. Enough 5+ DS3 wounds are dished out to completely wipe out both units remaining nine Wraithguards but leave the Spiritseer as last man standing. The Seer promptly fails his moralecheck at a penalty of 9, which isn't a shocker considering a morale value of 9. The seer legs it 10".
The Grey Knights on the left try their luck again with the Warpscythes, but fail.
The Grey Knights on the right try their luck another time to get to the objective inch by inch.


Turn 4.1 Iyanden
Warpscythes move out of the forest. The Seer moves out of the way.
Serpents glide in position to test the defenses of the Scriptor and his unit. The Scriptors luck holds - but not forever. The Inquisitor and two knights survive the onslaught.


Turn 4.2 Grey Knights
The Inquisitor and his knights chuck three grenades at the Serpent, but fail to break through the Armour. The Grey Knights on the left and their Ride shoot at the Warpscythes again, but fail to wound.

Turn 5.1 Iyanden
One Serpent fires at the knight at the objective marker, who go to ground. One knight falls.
Two Serpents knock out the Inquistor and his knights.
Warpscythes convert the surviving two knights on the left into pure ash.
The last Serpent uses it's Scatterlaser (and some luck) to knock out the Rhino.


Turn 5.2 Grey Knights
The Grey Knights are still gone to ground.

There is a round 6!

Turn 6.1 Iyanden
Serpents glide into firing position and wipe out the last Grey Knights.


Outcome
Grey Knights: 1 Warlord
Iyanden: 5, First Blood, Warlord, Objective

Iyanden Victory!

Wednesday 25 September 2013

Battle report Imperial Fists vs Iyanden 2000 pts

After the first game, I played the Iyanden army again on Tuesday night with another member my local gaming club. We agreed on 2000 points. My game partner setup up the terrain before we rolled for deployment and choice of halves.

I played my wraith list again. My opponent fielded an Imperial Fists Army with Black Templar allies.

Imperial Fists
Captain + command unit with melters and apothecary + land raider
Devastors with 4x Rocketlauncher
Tactical troop with melters + Rhino
Tactical troop with plasma, split into groups of 5.
TriLas Predator
Black Templar allies
Chaplain + Crusaders + Land Raider Crusader
Tactical troop + Rhino


Parameters
The Fists Player set up the table before we rolled deployment or sides.
Mission 1: Crusade, 5 Objectives
Deployment 4: Hammerstrike
Nightfighting in Turn 1
Imperial Fists attempt to steal the initiaive, but fail.


Deployment


Turn 1.1 Iyanden
Serpents advance 6" to 12". Wraithknight jumps forward one ruin. Wraithblades disembark.
Reavers ignore nightfighting thanks to their Exarch's nightsight, but fail to damage the Templar Land Raider.
A Serpent shoots at the Predator and inflicts 2 points damage using the serpent shield.
Two serpents and the wraith knight shoot at the tactical troup at the objective and inflict losses.


Turn 1.2 Imperial Fists
Templar Land Raider uses melter and assault cannon on shield-less Serpent.
Predator targets the same Serpent. Serpent loses hull points, but survives.
Fists Land Raider fires it's twin-linked lascannons at a serpent, which also loses hull points, but survives.


Turn 2.1 Iyanden
The absolute super-hero Marine bolder and bigger than even the Fluff is the one marked in the picture below. He managed to save all 10 hits his unit took! YIPPEE!


Total carnage!
Wraithguards disembark. A unit of five shoots each land raider. Both land raiders take penetrating hits which result in explosions! The Fist's command unit takes no losses, the templars take a few losses. A serpent each hits the passengers of each exploded land raider.
Two serpents pour fire into the devastator troup and wipe it out.
Reavers pop the Predator's last hull point.
The wraith knight shoots at the other squad at the objective marker.


Turn 2.2 Imperial Fists
The squad at the objective marker takes pot-shots with plasma at the Serpent, but is ineffective.
Templar troop advances, but fails the attack range roll and takes overwatch casualties.
Rhino advances and kills a Wraithblade with it's bolter.
Command troop assaults Wraithguards and kill two of them.
Imperial Fists Rhino advancese and take cover in the land raider crater.


Turn 3.1 Iyanden
Serpents disengage to get out of melter and plasma range.
Spiritseer blesses the Wraithguards with Battletrance. The Warpscythe bearing unit manages to line up in a fire line and hoses down the crater with their S4 DS2 flamethrowers, leaving turning to ash as the marine's only option.
Wraithguards on the other side of the table pop the Templar Rhino.
Reavers use their S5 DS3 rockets to wipe out the passengers.
Two Serpents fire at the Templars, inflicting further losses.
One serpent fires at the plasma squad at the marker, wiping it out.
Fist's command team kills two more wraithguards.


Turn 3.2 Imperial Fists
Templars fail their attack range roll again and suffer withering overwatch fire.
Command troup kills the last Wraithguard and is stood alone in the middle of a lot of yellow.
A lone marine is parked behind the ruin at the objective marker.


Turn 4.1 Iyanden
WOOOSH!


Result
Victory for Iyanden.
Imperial Fists: 0
Iyanden: 2 Warlord, First Blood


Saturday 21 September 2013

Battle report Tyranids vs Iyanden 2000 pts

Note: Since I live in Germany, I bought my books in German to avoid translation as communication barrier while learning 40k. For that reason, some unit or weapon names may be slightly off.

The game was agreed to run 2000 points. I played my wraith list as detailed earlier.

Tyranids
Hivetyrant with whip and sword (Ironarm, Psionic Screeching) + 3 Tyrantguards
Tyrannofex with Capsulecannon
5 Venerators
3 Swarmguards
2x20 Hormagants w/Poison
20 Symbionts w/Symbiarc (Puppetplay + x)
8 Ymgarl-Symbionts

Parameters
Mission 1: Crusade, 4 Objectives
Diagonal Deployment
Terrain placed on table cooperatively without rolling.
Small spikes in the middle can be used as 5+ cover.
Nightfighting is in effect in round 1.
Tyranids have initiative and deploy first. Symbionts infiltrate at 18".


Iyanden steals the Initiative!

Turn 1.1 Iyanden
Serpents move out of terrain zones, in which I placed them in ignorance of both start and target of a move requiring a difficult terrain check. The one next to the wraith knight is immobilized, the others make it. I should have placed them behind terrain for cover before moving.
All Serpent's passengers disembark.
Reavers benefit from their Exarch's Nightsight and shoot at the Tyrannofex, and wound it.
The three mobile Serpents  and the wraith knight have only one target with 36", which is bad news for the Symbionts. The immobile one and all wraithguards have no visble/in range target.


Turn 1.2 Tyranids
All Tyranids advance.
The Swarmguards are not in Synapse range, fail their morale check and run into the ruins.
The Tyrannofex shoots at a Serpent, but doesn't damage it.
The Symbiarch uses Puppetplay against a Wraithguard with warpscythe which I placed in the floor beneath the Reavers. The power works, but wounding fails.
 

Turn 2.1 Iyanden
One serpent finishes off the Symbionts unit.
Three Serpents and the knight shoot at a unit of Hormagaunts, inflicting heavy losses.
The reavers shoot at the tyrant.


Turn 2.2 Tyranids
Tyranids advance.
Swarmguards succeed with their synapse check and destroy a serpent.
Ymgarl Symbionts appear in front of the Wraithguards in the forest and attack both units.
Overwatch kills two attackers. Two Wraithguards die.
Other reserve rolls fail.


Turn 3.1 Iyanden
The immobilized Serpent kills all but one Hormagant of the previously decimated group.
A Serpent, the knight and the reavers shoot at the Tyrant and inflict losses on his guards.
A Serpent eliminates the front rank of the second hormagant unit.
Ymgarls fail to wound the Wraithguards. Wraithguards kill a Ymgarl.


Turn 3.2 Tyranids
Everything goes wrong. The Tyrannofex misses again.
The Swarmguards fail their test and continue to stand in front of the wall without a target in sight. The Tyrant casts Psionic Screeching at the knight and succeeds, but rolls less than the knight's morale and therefore doesn't cause any wounds.
The Tyrant and the Gaunts fail their attack range rolls.
Ymgarls fail to wound and suffer losses.
Venerators reserve roll succeeds. Deep striking behind the serpents fails and the roll grants the opponent the choice of the deep strike location. The tyranid player pro-actively places the models in the diagonally opposite, furthest corner.
 

Turn 4.1 Iyanden
Concentrated fire against the Tyrant slowly but surely wears him down.


Turn 4.2 Tyranids
Alpha Tyrgon appears with 9" deviation and narrowly avoids hitting a ruin. He shoots the Wraithblades, but they make their saves.
Tyrannofex and Venerators advance.
Hormagants attack Wraithknight and deal two points damage.
Tyrant fails his attack roll again.
 

Turn 5.1 Iyanden
A Serpent halves the HP of the Tyrgon.
Another Serpent damages the Tyrannofex.
The Wraithknight kills some Gants, but takes two more points damage.
The Wraithguards do a tricky shuffle that ends up amusing the Tyranids with cozy warm fire that cannot wound the Tyrant thanks to Ironarm.


Turn 5.2 Tyranids
Tyranids advance.
Tyrant casts Psionic Screeching and suffers perils of the warp, which kills him since he had only one HP left.
Tyrgon attacks Wraithblades, but kills only one since the others use their invulnerable save successfully. Suffers wounds.


There is no sixth turn!

Result
Tyranids: 1 point Linebreaker
Iyanden: 2-5 Warlord, First Blood, maybe an objective, didn't measure.

Victory for Iyanden!

Obviously, my opponent was extremely unlucky with his dice rolls. Having no sixes at all after the initial assault with the Ymgarls was atrocious, missing 8/10 Tyrannofex shots and most Guard Synapse tests as well as the deep strike failure all hurt. Not to mention setting up the Symbionts and then losing the initiative.

I had played my Chaos Space Marines against his Tyranids several times already, losing each time. As a first 1v1 with this new army and new list, this was really inspiring.

Wednesday 18 September 2013

Iyanden 2000 Wraith-List

After a lot of masking tape action, I got my models ready to play. The paint job isn't finished, but I was itching to see what they could do. Oh boy, I discovered they can do wonderful things  I'll post battle reports shortly.


HQ
Spiritseers [Iyanden] (185)
+ Wraithseer,  The Wraithforge Stone [Iyanden], Guardian Helm of Xellon [Iyanden] (115)
+ Wraithseer (70)

4 Troops
5 Wraithguards (160)
+ Serpent, TL Scatterlaser, Shurikencannon, Holofield (145) (305)
5 Wraithguards (160)
+ Serpent, TL Scatterlaser, Shurikencannon, Holofield (145) (305)
5 Wraithguards, Warpscythes (210)
 + Serpent, TL Scatterlaser, Shurikencannon, Holofield (145) (355)
5 Wraithblades, Ghostaxe and Shield (160)
+ Serpent, TL Scatterlaser, TL Shurikencatapult, Holofield (135) (295)

Heavy Support
Wraithknight, Suncannon and Shield, 1 x Scatterlaser (300)

Total 1750 Points

Addition for 2000 Point games:
Heavy Support:
6 Reavers,
+ Starstrike rockets,
+ Exarch, Reaver-Launcher, Starstrike Rockets, Nightsight, Firestorm

I put this list together with the idea of playing something completely different. Iyaden being heavily reliant on Wraith constructs appealed to me and I went as far as I could points permitting with this theme.

The list uses the Iyanden Eldar Supplement. That allows me to designate the Wraithknight as Warlord and gives me the chance that he gets nice buffs from the Iyaden Warlord table. The supplement also allows sticking up to five Spiritseers into one HQ slot. The Wraithforge Stone can heal a Wraith unit for 1 point on 3+, the guardian helm is automatic success on Look-out Sir! and permits delegating challenges to a wraith model in the same unit.

More importantly for the short-weapon range of the droids (12", flames or melee only) is the Iyanden Primaris Power for Runes of Battle. This grants all wraith units within 12" of the caster Battletrance and Furious Charge, offering improved mobility.

The Serpents can transport 6 of the Wraithguards - or five of them plus a seer. The 12" movement distance is great, but the serpents do not offer fireports or serve as assault vehicle.

The Wraith units offer a respectable amount of AP2 attacks. In total 10 shots S10 AP2, 5 Flame templates S4 AP2 and three 3" blasts S6 AP2 blasts from the knight.

In addition to the wraith AP2 attacks, the serpents offer significant fire support. A hit with the twinlinked Scatterlaser makes all other weapons twinlinked. The Serpentshield offers D6+1 60" S7 shots that ignore cover. Add a Shurikencannon and the Serpent kicks out a nasty amount of S6/S7 shots which lack AP, but saturate a target quickly.

I wrote the above in hindsight, with four 1v1 games under my belt in the last few days.

Monday 9 September 2013

Wave Serpent progress

A lot of patience using blue tape, the hobby knife and tweezers was used to mask the other three serpents as well. I then pre-highlighted the edges with white primer and applied Vallejo Model Air blue. A night later, I peeled the blue tape, which left me with four top shells like the one on the right.


Next, I hit the previously grey-black primed weapons and lower hull with Vallejo Dip-shade black using my Airbrush with the big 0.4 nozzle. This makes them look less clean and boring!

Then I set my airbrush aside and picked up a brush. I painted the lines between the body pandels with German Grey rather than black. This was the first time I did any black-lining. Clearly, I could have benefitted from reading up on it or practicing it earlier. Breaking the surface tension of the paint with dishwashing detergent might have been helpful. Anyway, it looks better than the naked hull. I'll have to clean up some bits in the yellow.

The soulstones I painted with VMA tank brown, then with a tank brown sand mix, sand and black to create a diagonal gradient. This isn't as clean and nuanced as doing the same with airbrush, but fairly clean. After this was dry, I added Tamiya clear red diluted with a bit of alcohol.

The pilots got some details in blue, black and Tamiya clear blue. I let this turn to green on the instrument panel. After these steps and gluing in the turrent antenna, rear air-intake, sensor thingie and cockpit, the serpents look like this.


I measured the big flying base height using my calipers. It clocks in at 24mm. My plan is to use regular 60mm opaque plastic bases with an inverted 20mm high U stood on it. That U will be painted just like the lower hull and look like vertical fins thanks to the cut and colour. 6x2mm Magnets will connect the base to the lower hull. I'll glue 5x3mm magnets under the bases to make them stick to my sheetmetal in the carrying case. This solution will stop the wobble of the regular flight base, but still leaves me the option to use those regular bases.

Sunday 8 September 2013

Iyanden Knight and Serpents WIP

Inspired by playing against Eldar for the first time recently with my CSM, I dusted off the pounds of Eldar metal I got earlier this year from eBay. Those minis came with a Iyanden theme, but have since been stripped and now re-based and primed. I had the Eldar Codex and the Iyanden Supplement already, since they were on my to-do list. Now was the time to get busy with this. My intent is to have a playable 1750 point army painted and ready to go for a local club meeting next Friday.

Clearly, I have to try the wraithknight. Just because he looks awesome. Just as certain is that putting him on the table in naked plastic is a no-go. Taking what I learned doing a wraithknight recently, I went to town on mine.

Clearly, the fact that I liberally put magnets everywhere when building this helped making the parts accessible, but still wasn't enough to minimize masking for airbrush. This shot shows all parts with grey Vallejo primer, blue and German grey applied.


I then covered up the grey painted areas, did the blue parts and covered those up. I used mostly masking tape, but tried liquid mask on the shoulder pads, one knee and the socks. Looks a bit like a papercraft project! 


Unfortunately, I messed up the liquid mask. Again. It wasn't the drying time or thickness of the mask this time, I gave it almost a day. Yet, it stuck on the blue paint and didn't rub off as intended, leaving spots behind. My best guess is that I didn't give the blue long enough time to dry and messed that up with the mask. Oh well. I cut off the shoulder pads, sanded them and then did them over before gluing them back. The kneepad and the socks I only did clean-up and touchup on.


The yellow is Citadel Yriel Yellow with Flash Glitz Yellow as highlight. The blue is just straight basic Vallejo Model Air blue, the grey is VMA German grey with Citadel Nuln Oil over it. Citadel Warplock Bronze and hashut Copper for the metal parts. VMA Tank Brown, Sand and Tamiya Clear Red for the gems. VMA white primer and white paint for the helmet and the glaive.


Next up are wave serpents. Yes, they are FOTM, but also staple Eldar Transport. I'm not interested in playing six serpents, since I want to use Wraith units instead of the cheaper infantry. That's why I picked four.

After the hassle with excessive masking to overcome problems created by too early or too far assembly with the wraith knight, I wanted to be certain not to do this to myself with the serpents.

I inserted 6x2mm magnets for the chin and top weapon mounts. I beefed up the turrets sides with 2mm thick plasticard and used 6x6mm magnets inserted into the plasticard. The magnets are totally oversized for gripping power, but the size just works with the gap between turret and weapons. I would have used 3x6 or similar if I had them on stock, but didn't want to wait. I carefully drilled out the holes in the scatter lasers up to 3mm and inserted 3x3mm magnets. The choice was clear since their mount part is 3mm wide. The little armour plates that go on the weapons have recesses that are marginally over 2mm wide and deep, so I stuck 2x2mm magnets in there.


Using poster glue pads, I stuck all the small parts which didn't receive magnets on metal cans and lids split by colours. The bottom hulls I primed in Vallejo German Grey-Black, just like the weapons and air intakes. Everything else I primed white. Not really by choice, but my grey Vallejo Primer was pretty much out. Thinking to try the Vallejo Yellow which needs a lighter base than the Citadel, I went with it.


I then liberally applied VMA Medium Yellow and let that dry overnight. Next I got busy with blue tape and a hobby knife to put a mask on the top hull. Then I hit it with VMA blue and then with some more blue with white mixed in to create gradients rather than completely flat blue segements. That distracts from the really annoying to highlight yellow. ;-]


After removing the mask, it looks like this. Just clicked together with the magnets of course, nothing glued yet. You can see the serpent spikes on the right.


I'm not certain what I'm going to do with the pilot or the transparent plastic in front of him, but I'll pick something once I got the rest done.
Another thing I'll have to figure out is transfer decals. I'll test this and see if I like the supplied decals or if I'll try to cut my own stencils for airbrush decals. Looking at an army, that might make sense, but the quality needs to be on the level. I'll do some test pieces.
A final point are alternative bases for the grav tanks. The originally supplied ones are way too wobbly for my taste.

Monday 2 September 2013

Masking practice

In preparation for the bigger Eldar vehicles and the Wraithknight I needed to practice airbrush gems as well as using liquid masking agent and masking tape. Looking at likely models to use for this, I grabbed some jetbikes and a viper, which came with a lot of metal minis in an eBay lot. I had removed a lot of paint from the plastic models and set them aside a while ago.

I worked them over a little bit, whereever I noticed paint or mold lines left and then basecoated them using Vallejo Airbrush Primer in Grey. Then I followed BuyPainted's Eldar gem airbrush tutorial, creating a diagonal colour gradient between VMA Tank Brown and Sand, with a dash of black at the top and a coat of Tamiya Clear Red diluted with Alcohol.


When the gems seemed dry, I applied the liquid mask. I found that much more difficult than explected. Since the material is very thick, like wood glue and just as opaque white, it doesn't flow around the gem contours. Instead it needs to be pushed very bit of the way. In addition, I was under the impression that a thick-ish coat is needed.

In any case, after the mask dried surprisingly quickly and turned clear, I hit the gems and the overspray with some more grey primer. Then, I diluted some Citadel Yriel Yellow and covered the miniatures with that, followed by Flash Glitz Yellow from above.

With the majority base colour applied and the masked gems hidden away, I then went to town with masking tape.


 After rechecking each model's masking tapes, I hit it with VMA Blue followed by some more VMA Blue with white mixed in. After waiting for a good while for the paint to dry and being too wussy to whip out the heat gun to help things along, I started peeling. There was a little leakage, but nothing major.

The gems were a bigger problem. At first I tried to peel the liquid mask off using my fingernails, then I tried gentle nudging at the edge with a toothpick. I ended up with a messy border though, I guess it was too much mask in some places, or too much primer on top of it, forming an elastic sheet that I was then pulling on. Then I found my results improved a lot after scoring the edge of the gem very gently with the hobby knife and then just sliding my finger over the mask, ripping it off easily. Clearly, I need to work on my technique for the liquid mask, but first steps are done. The bigger the gem is, the less problems it should present for this process.

All in all, the result is ok or even nice - unless you look too close and get to see past the touch-up I did around the stripes and the gems. ;-]


These bikes need some dark colour for the weapons and turbines, some dash of something on the instruments and of course the crew of the viper needs some love. The Jetbike riders are still in a box, being too messed up for me to fix them before the experiment. I'll deal with them later. Hopefully a new tool will arrive soon and make getting pesky colour off their tiny details a breeze.

Sunday 1 September 2013

New tools and toys!

Yesterday two new tools arrived. A Badger paint mixer and an Tamiya airbrush stand set. The mixer is really meant for Vallejo paint for when the pigment has settled. Shaking it creates bubbles, which is sub-optimal for airbrushing. This gizmo isn't much more than a housing for two AA cells, a switch, a small motor and a metal mixing rod, but it's made for exactly what I need.

The stand set comes with two stands, a smaller one with two spring loaded clamps and a bigger one with a load of holes on the top. The idea with the small one is to hook into a model car chassis from underneath. The bigger one has holes suitable for loads of pins we like to use, comes with a set of small clamps that fit into recesses at the edge as well. And of course both of them turn and have ribbed bases for good control with your fingertips.


Since I had these Eldar bits waiting for attention, I tested my new toys with them. Well worth the (very moderate) price on these items! =]